

What if the idea fails during the sprint? A design sprint uses five days to build and test a prototype, helping a team reduce uncertainty before committing to a direction. The right design sprint facilitation tools keep collaboration clear, but the process is designed to learn from an idea, not guarantee its success.
It’s reasonable to worry that a remote workshop will feel fragmented or that an in-person session will get lost in activity. In either setting, simple collaboration boards and deliberate tool choices help people stay oriented and focus on the decision at hand. The facilitator’s guidance matters just as much as the software.
This guide explains how to choose boards and practical tools for remote and in-person teams, what a facilitator does across sprint activities, and how free resources can support preparation. You’ll also see how prototype testing turns assumptions into useful evidence, so a result that challenges the original idea can still move the team forward.
Key Takeaways
- Set up a shared collaboration board that makes decisions, open questions, and next steps visible to remote and in-person participants.
- Choose tools that reduce friction and keep attention on the problem, rather than adding extra steps to the workshop.
- Use facilitator guidance to move the team through exercises with a clear purpose and a shared understanding of what comes next.
- Use free templates and exercises to structure preparation, sketching, and prototype testing without letting the tools dictate the solution.
- Treat prototype testing as a way to learn: consistent interviews and an open mindset help the team use feedback to decide what to do next.
Collaboration boards for remote and in-person workshops
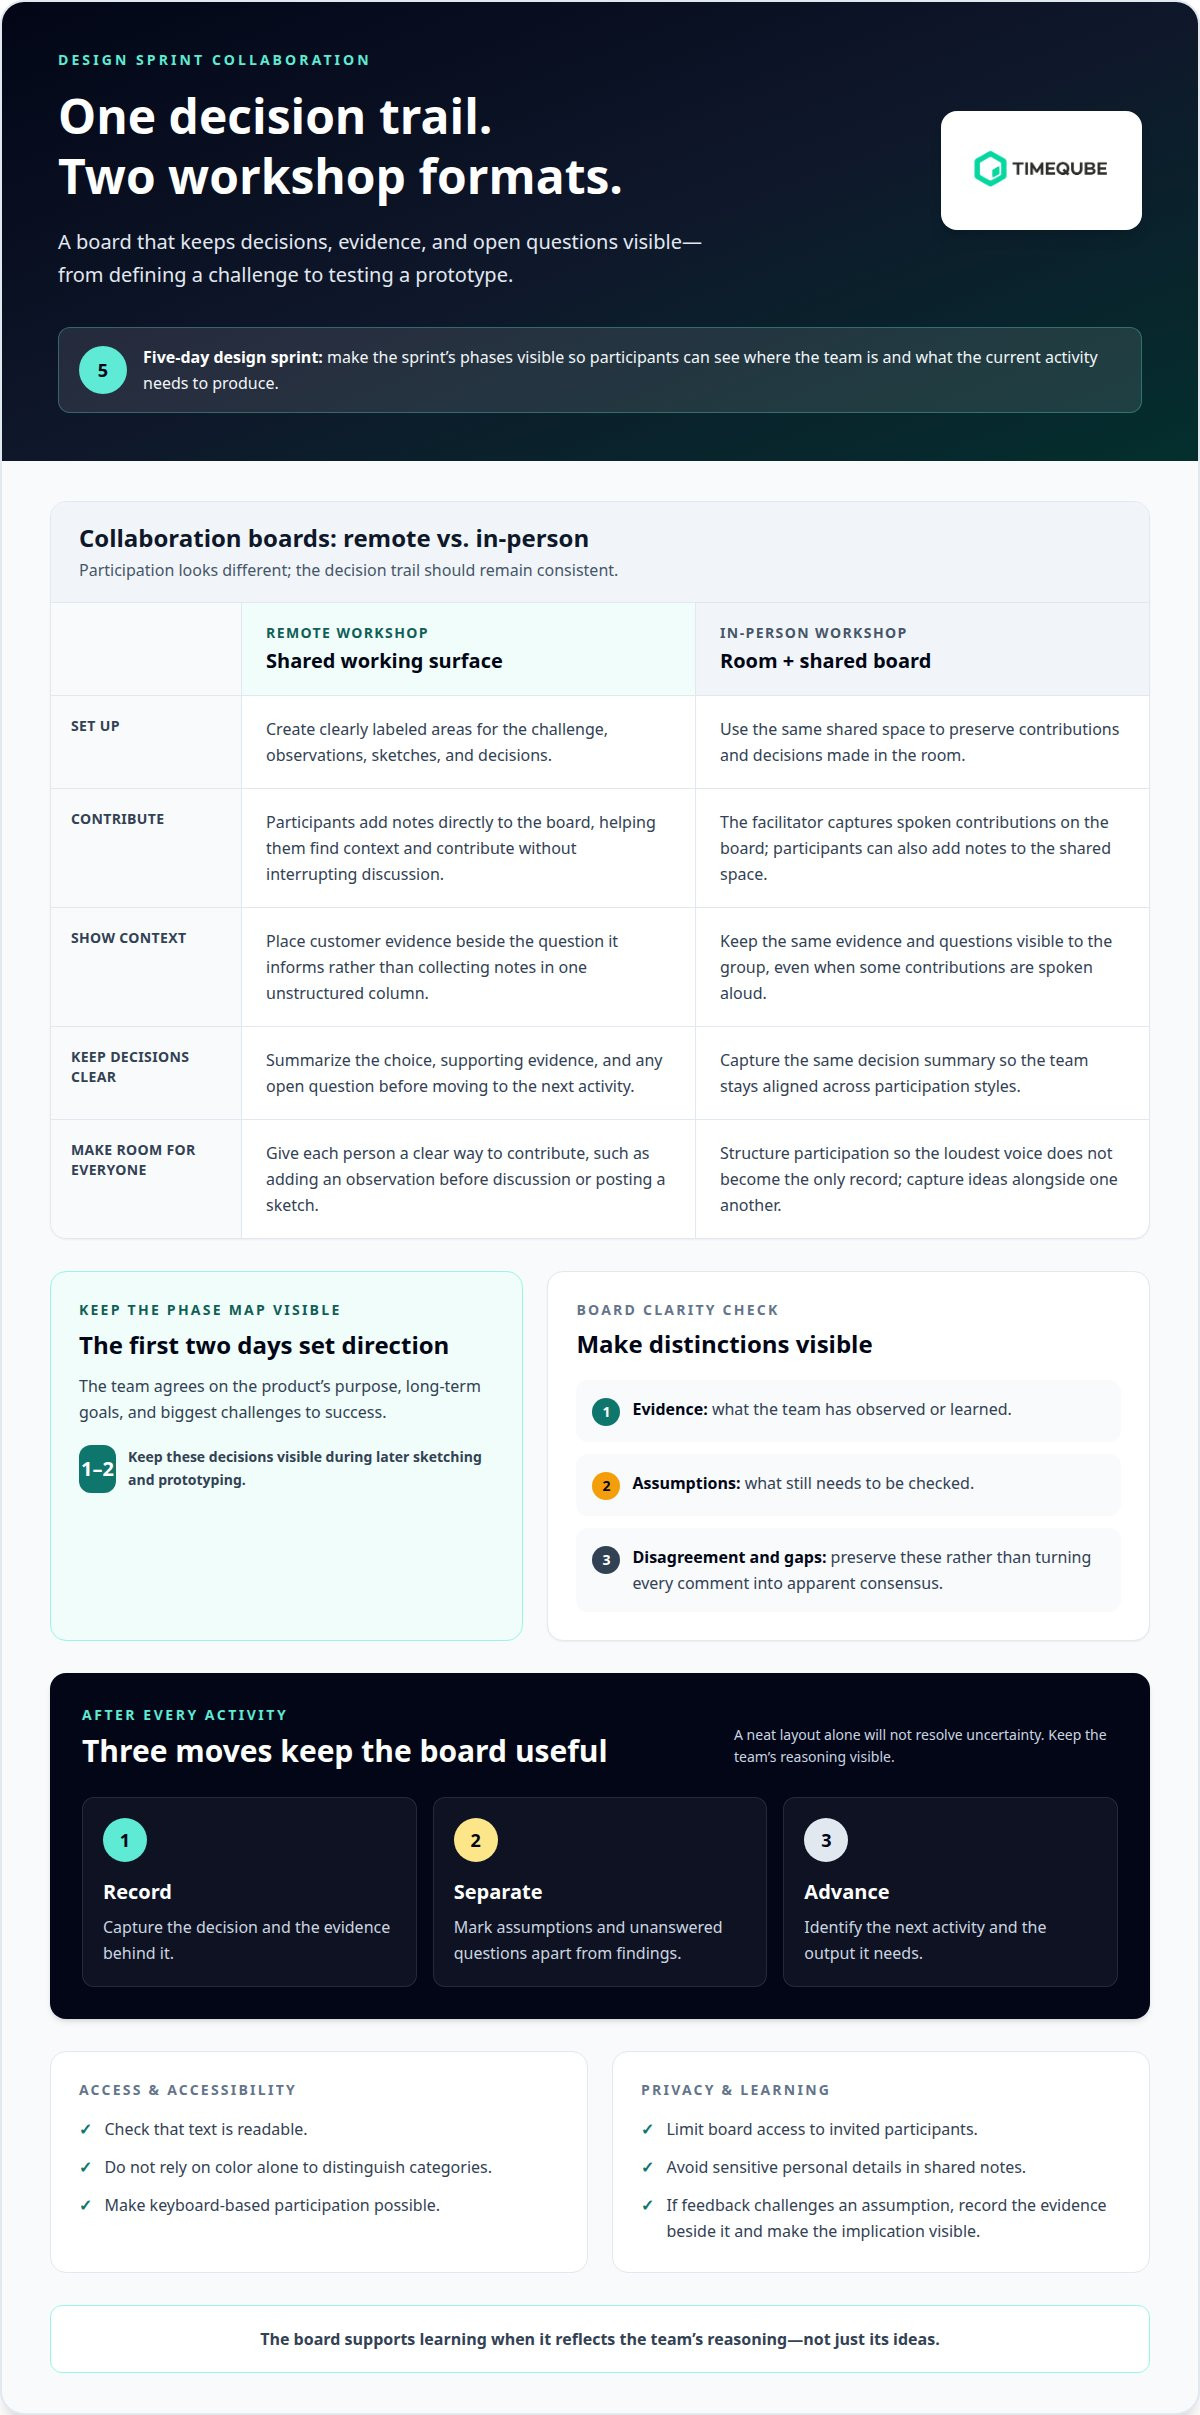
A five-day design sprint moves from defining a challenge to testing a prototype, so the board should make each phase visible. Organize its space around decisions, evidence, and unresolved questions.
Remote Workshop Boards
For remote sprint facilitation, use a shared board as the workshop’s visible working surface. Create separate areas for the challenge, observations, sketches, and decisions, then label each area clearly. For example, place customer evidence beside the question it informs rather than collecting notes in one unstructured column. Clear sections help remote participants find context and contribute without interrupting the discussion.
Facilitation Across Workshop Formats
In-person and remote sessions need the same decision trail, even when participation looks different. A facilitator can capture spoken contributions on the board in a room, while remote participants add notes directly to the shared space. Before moving to the next activity, summarize the choice, its supporting evidence, and any open question. This keeps a collaborative workshop aligned across formats.
Use the board to show the sprint’s sequence, not just its ideas. A simple phase map lets participants see where the team is in the innovation process and what the current activity must produce. During the first two days, the team agrees on the product’s purpose, long-term goals, and biggest challenges to success. Keep those decisions visible during later sketching and prototyping.
Structure participation so the loudest voice doesn’t become the only record. Give each person a clear way to contribute, such as adding an observation before discussion or posting a sketch alongside others. Then group related notes and identify where the team has evidence, disagreement, or a gap in understanding. Preserve those distinctions on the board instead of turning every comment into apparent consensus.
Consider accessibility and privacy before sharing a board. Check that text is readable, color isn’t the only way to distinguish categories, and keyboard-based participation is possible. Limit access to invited participants, and avoid placing sensitive personal details in shared notes.
Keep the board useful after each activity with three deliberate steps:
- Record: Capture the decision and the evidence behind it.
- Separate: Mark assumptions and unanswered questions apart from findings.
- Advance: Identify the next activity and the output it needs.
These design sprint facilitation tools support learning when the board reflects the team’s reasoning. A neat layout alone won’t resolve uncertainty. For example, if interview feedback challenges a prototype assumption, record the evidence beside the assumption and make the implication visible. The team can then use the board to guide its next decision, whether participants are around one table or joining remotely.
Tool selection to reduce workshop friction
For voting, use visible marks; for timeboxing, use a clear timer; for decisions, record the choice and its rationale. In a five-day sprint, tools should support progress without distracting from the problem.
Facilitated Workshop Canvases
A sprint canvas gives a facilitator a structured place to capture the challenge, desired outcome, assumptions, and decisions. In a session with a client team, the facilitator can connect each activity to a canvas field, then make unresolved questions visible. Look for a layout that distinguishes evidence from opinion. That distinction helps a leader see what the team knows before moving into ideation.
Design Sprint Templates
Workshop templates can make a design sprint’s sequence easier to follow. Use sections for the challenge, inspiration, sketches, prototype plan, and testing questions. A template should guide participation without dictating the answer. For example, a sketching page can give each participant the same prompts while leaving room for different concepts. The facilitator can then compare ideas against the challenge.
Voting and Decision Tools
Use dot voting or another visible marking method to show which concepts attract attention. Treat votes as input, not as the final decision. The facilitator should capture the chosen direction, the reason for choosing it, and any concern that remains. A decision log keeps the team’s rationale connected to later prototype and testing choices.
Choose tools by the friction they remove. If participants must switch between several boards, repeat information in different places, or learn unfamiliar controls, the setup competes with the workshop. A focused toolset can include a shared workspace, a voting method, a decision record, and a timer. Each should have a distinct role.
Timeboxing works best when the activity has a visible endpoint and a defined output. A timer can signal the end of ideation, while a prompt on the board states what participants should produce. The facilitator can announce the transition and preserve unfinished questions for later review. This keeps the schedule purposeful without implying that every useful discussion must stop abruptly.
Before the sprint, test the tools in the format the team will use. For a remote session, confirm that participants can add ideas and vote in the shared workspace. For an in-person workshop, prepare a clear way to capture contributions in the same decision record. A short rehearsal can reveal access or navigation friction before it interrupts the group.
Use this selection check:
- Purpose: Match each tool to one activity or output.
- Access: Make participation possible for everyone in the session.
- Continuity: Keep decisions and evidence connected through the sprint.
Good design sprint facilitation tools reduce operational effort, not human judgment. AI may help organize ideas, but the team still needs stakeholder alignment and customer validation. Choose the simplest setup that supports the next decision, then adapt it if the five-day process reveals a real obstacle.
Facilitator guidance through sprint activities
A facilitator guides the team through five stages, keeping each activity tied to a decision or learning goal. The role isn’t to supply the answer. It’s to make the sequence clear, draw out different thinking, and help the group turn insights into a testable direction.
During the first two days, the team agrees on the product’s purpose, long-term goals, and biggest challenges to success. The facilitator can keep these decisions visible and separate agreed points from assumptions. For example, if participants disagree about the main user problem, record both views before choosing which question the sprint must investigate.
Structured exercises support participation without narrowing the ideas too early. The Four Step Sketch guides people to review key information, begin designing on paper, consider variations, and develop a detailed solution. The facilitator explains the expected output at each step, protects quiet working time, then helps the team compare sketches against the sprint challenge.
An inspiration exercise gives the team a deliberate way to look beyond familiar solutions. Participants identify products or services that could inform later concepts, then explain which feature or interaction offers useful inspiration. The facilitator keeps the discussion focused on transferable insights, rather than copying another product or turning the activity into an open-ended tour of examples.
As the sprint moves toward a prototype, prioritize learning over polish. The objective is to create something realistic enough to test, not a finished product. This distinction helps the team decide what to include: a prototype might show one important user flow while leaving unrelated screens unfinished. Each design choice should help answer a question.
For prototype interviews, support a consistent process and an unbiased mindset. Ask each participant the same core questions, let them respond before explaining the design, and note where their actions differ from their comments. This yields more useful insights than steering a participant toward approval. The team can then connect observations to decisions about what to change.
Across these activities, the facilitator can use a simple sequence:
- Frame: State the activity’s purpose and the decision it supports.
- Guide: Explain the steps, then give participants space to work.
- Capture: Record the outcome, evidence, and open questions.
- Transition: Connect the result to the next sprint activity.
This sequence keeps facilitation focused on progress, not performance. The team’s skills and viewpoints remain visible, while each stage produces material for the next decision. If prototype evidence challenges the initial direction, that learning is a useful sprint outcome, not a failure of facilitation.
Free design sprint resources
Free guides, worksheets, and planning materials can help a team understand the design sprint method before running a workshop. Google Ventures published the method in 2016, giving teams a reference point for the sprint’s activities and purpose. A resource is useful when it clarifies what participants should do, what each activity produces, and how the result informs the next step.
Start with the challenge, not the template. A planning worksheet should help the team frame the problem, identify assumptions, and define what it needs to learn. For example, a team exploring a new sign-up process could note where users hesitate, then shape a sprint question around that uncertainty. This gives each exercise a clear purpose.
Use free materials selectively. A complete set of templates may look convenient, but copying every page can create work without improving the method. Choose resources that support the team’s immediate needs:
- Preparation: A brief helps participants understand the challenge and arrive with relevant context.
- Activities: A sketching guide explains the task and the expected output.
- Prototype planning: A checklist helps the team focus the prototype on a question it can test.
- Learning: An interview guide helps the team gather observations in a consistent way.
User testing can produce evidence for informed decisions, and sprint testing can happen in hours rather than weeks. Free interview prompts can help prepare neutral questions, but they shouldn’t become a script that blocks follow-up. If a participant hesitates during a prototype task, ask what they expected to happen. Their response may reveal an unanticipated usability issue.
Before using a free resource, check whether it fits the sprint’s purpose. Does it help the team make a decision, gather evidence, or prepare for a specific activity? Does it leave room to adapt prompts for the product and its users? A worksheet designed for broad ideation, for instance, may not help a team focused on testing one service flow. Keep only materials that support the learning goal.
Free resources can also help new facilitators rehearse the sequence. Use a guide to prepare transitions between activities, identify the output each stage needs, and plan how observations will inform decisions. Keep the working materials together so the team isn’t searching across separate files during the sprint. A concise, adapted set is easier to use than a large collection of unused templates.
Treat each resource as scaffolding, not proof that the team has found the right answer. A template can organize the work, but prototype feedback supplies the evidence. If testing challenges the initial assumption, record that learning and use it to shape the next decision.
Sprint facilitation and team guidance
A design sprint facilitator guides the team through five stages, keeping the challenge, activities, and expected outcome connected. Good facilitation matters more than software: tools can organize work, but people must interpret evidence and make decisions. The facilitator protects that thinking time and helps the group move forward without forcing agreement too early.
At the start, define the challenge in terms the team can act on. For example, “How might we help new users complete sign-up?” gives the sprint a clearer focus than “Improve the product.” Bring the group back to that challenge when discussion drifts toward unrelated features. This keeps the sprint centered on a question the team can investigate.
During activities, clarify the task and its output before participants begin. A sketching exercise should produce concepts the team can compare, not a general conversation about possible improvements. If one person dominates, invite independent contributions before group discussion. This creates room for different skills and perspectives, including insights that might otherwise remain unspoken.
Keep decisions distinct from assumptions. If the team selects a direction because it seems promising, record the reason and what still needs evidence. That distinction prevents confidence from being mistaken for validation. The facilitator can use the distinction later, when the team reviews what it learned and decides whether the current direction still addresses the challenge.
For a remote team, state who is speaking, where contributions belong, and when the group will pause to decide. For an in-person team, clarify the same participation rules before discussion begins. In either format, invite quieter participants to share their views without putting them on the spot. The facilitator creates a process where each contribution can inform the outcome.
Use the five stages as checkpoints rather than a reason to keep moving regardless of evidence. At each transition, the facilitator can ask:
- Challenge: Does the current work still address the central problem?
- Decision: What has the team chosen, and why?
- Evidence: What observation supports that choice?
- Next step: What must the next activity produce?
AI can help organize notes or surface patterns, but it shouldn’t replace human insight, stakeholder alignment, or customer validation. Treat an AI-generated suggestion as a prompt for discussion, not a decision. Generic ideas or bias can weaken the sprint if the team accepts them without examining their relevance to its users and challenge.
The outcome is reduced uncertainty, not simply a longer list of ideas. One design sprint may not resolve every open question; the team’s evidence can show what deserves further work. Well-chosen design sprint facilitation tools support that judgment, while the facilitator keeps attention on what the sprint has learned and what decision comes next.
Timeqube
Timeqube offers physical visual timers that use color-coded light signals to make time visible without digital distractions. For meeting teams, Timeqube for Business Meetings can support focused timekeeping alongside the sprint’s boards, templates, and facilitation. It doesn’t replace a facilitator or collaboration tools; it provides a separate visual cue when the team wants time to remain present without checking a screen. Timequbes with Your Logo offer a branded option for businesses. Choose a visual timer when your team wants a calm, screen-free way to stay aware of time during discussions or work sessions. For details about which option fits your setting, contact Timeqube.
Carry focused timing into your next session
As you refine your design sprint facilitation tools, consider how the team can stay aware of time without adding another screen or notification. A physical visual cue can complement the tools that support discussion and decisions.
Timeqube offers Timeqube for Mind/Body Therapies, Timequbes with Your Logo, and Timeqube for Business Meetings. The meeting option provides a visual timer alongside your workshop setup. As one of your design sprint facilitation tools, it makes time visible without replacing the facilitator or collaboration workspace.
Contact Timeqube to discuss visual timing for focused meetings and consider how a calm time cue could fit your team’s next session. A thoughtful setup gives people more room to focus on the decision in front of them.
Frequently Asked Questions
What if the idea fails during the sprint?
A weak idea can still produce a useful outcome if testing reveals why it doesn’t work. Treat the result as evidence about the challenge, not a verdict on the team. For example, if users misunderstand the prototype’s main action, identify whether the problem lies in the wording, sequence, or underlying concept. Use that finding to choose what to revise or investigate next.
What tools are needed to facilitate a design sprint?
A sprint needs ways to organize work, capture ideas, support decisions, and test a prototype. Design sprint facilitation tools can include a workspace, a canvas, a voting method, timekeeping, and a place to record interview observations. Choose each for a specific activity. For instance, keep testing notes beside the prototype question they address, so the evidence remains easy to interpret.
Which tools help remote teams run a design sprint?
The most useful remote setup makes participation and progress visible without constant tool switching. Use a shared board for activities and decisions, plus a reliable way for participants to discuss and clarify their work. Before the workshop, confirm that everyone can access and contribute. Use readable labels and don’t rely on color alone to distinguish information. Keep sensitive personal details out of shared notes.
What are the best in-person design sprint tools and materials?
For an in-person sprint, prepare a visible workspace, paper, pens, sticky notes, and a clear way to record decisions. For example, design sprint facilitation tools for a sketching session can include paper templates that prompt participants to review information, explore variations, and develop a concept. Keep materials within reach and group related work together so the facilitator can compare ideas without interrupting the activity.
What design sprint templates and kits are available?
Free sprint resources can include planning worksheets, activity prompts, sketching guides, prototype-planning pages, and interview-question templates. Choose a small set that matches the team’s challenge rather than using every available page. For example, an interview guide can help keep questions consistent, while a planning worksheet clarifies what the team needs to learn. Adapt prompts to the product and users instead of treating a template as a fixed script.
What are the steps for facilitating a five-day design sprint?
A five-day design sprint moves through understanding the challenge, sketching possible solutions, choosing a direction, building a prototype, and testing it with users. In the first two days, the team agrees on the product’s purpose, long-term goals, and key challenges. Sketching and selection turn that understanding into a testable concept. Prototyping prioritizes learning over polish, and user interviews provide evidence for the next decision.